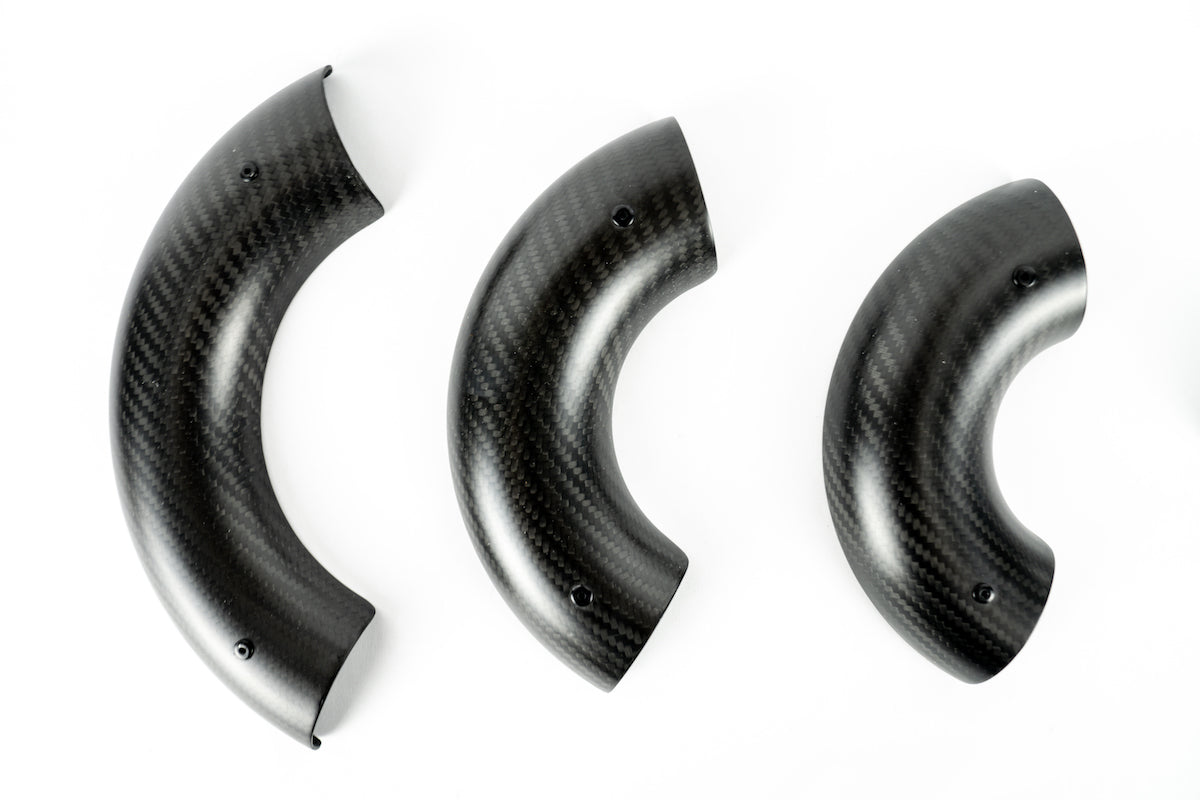
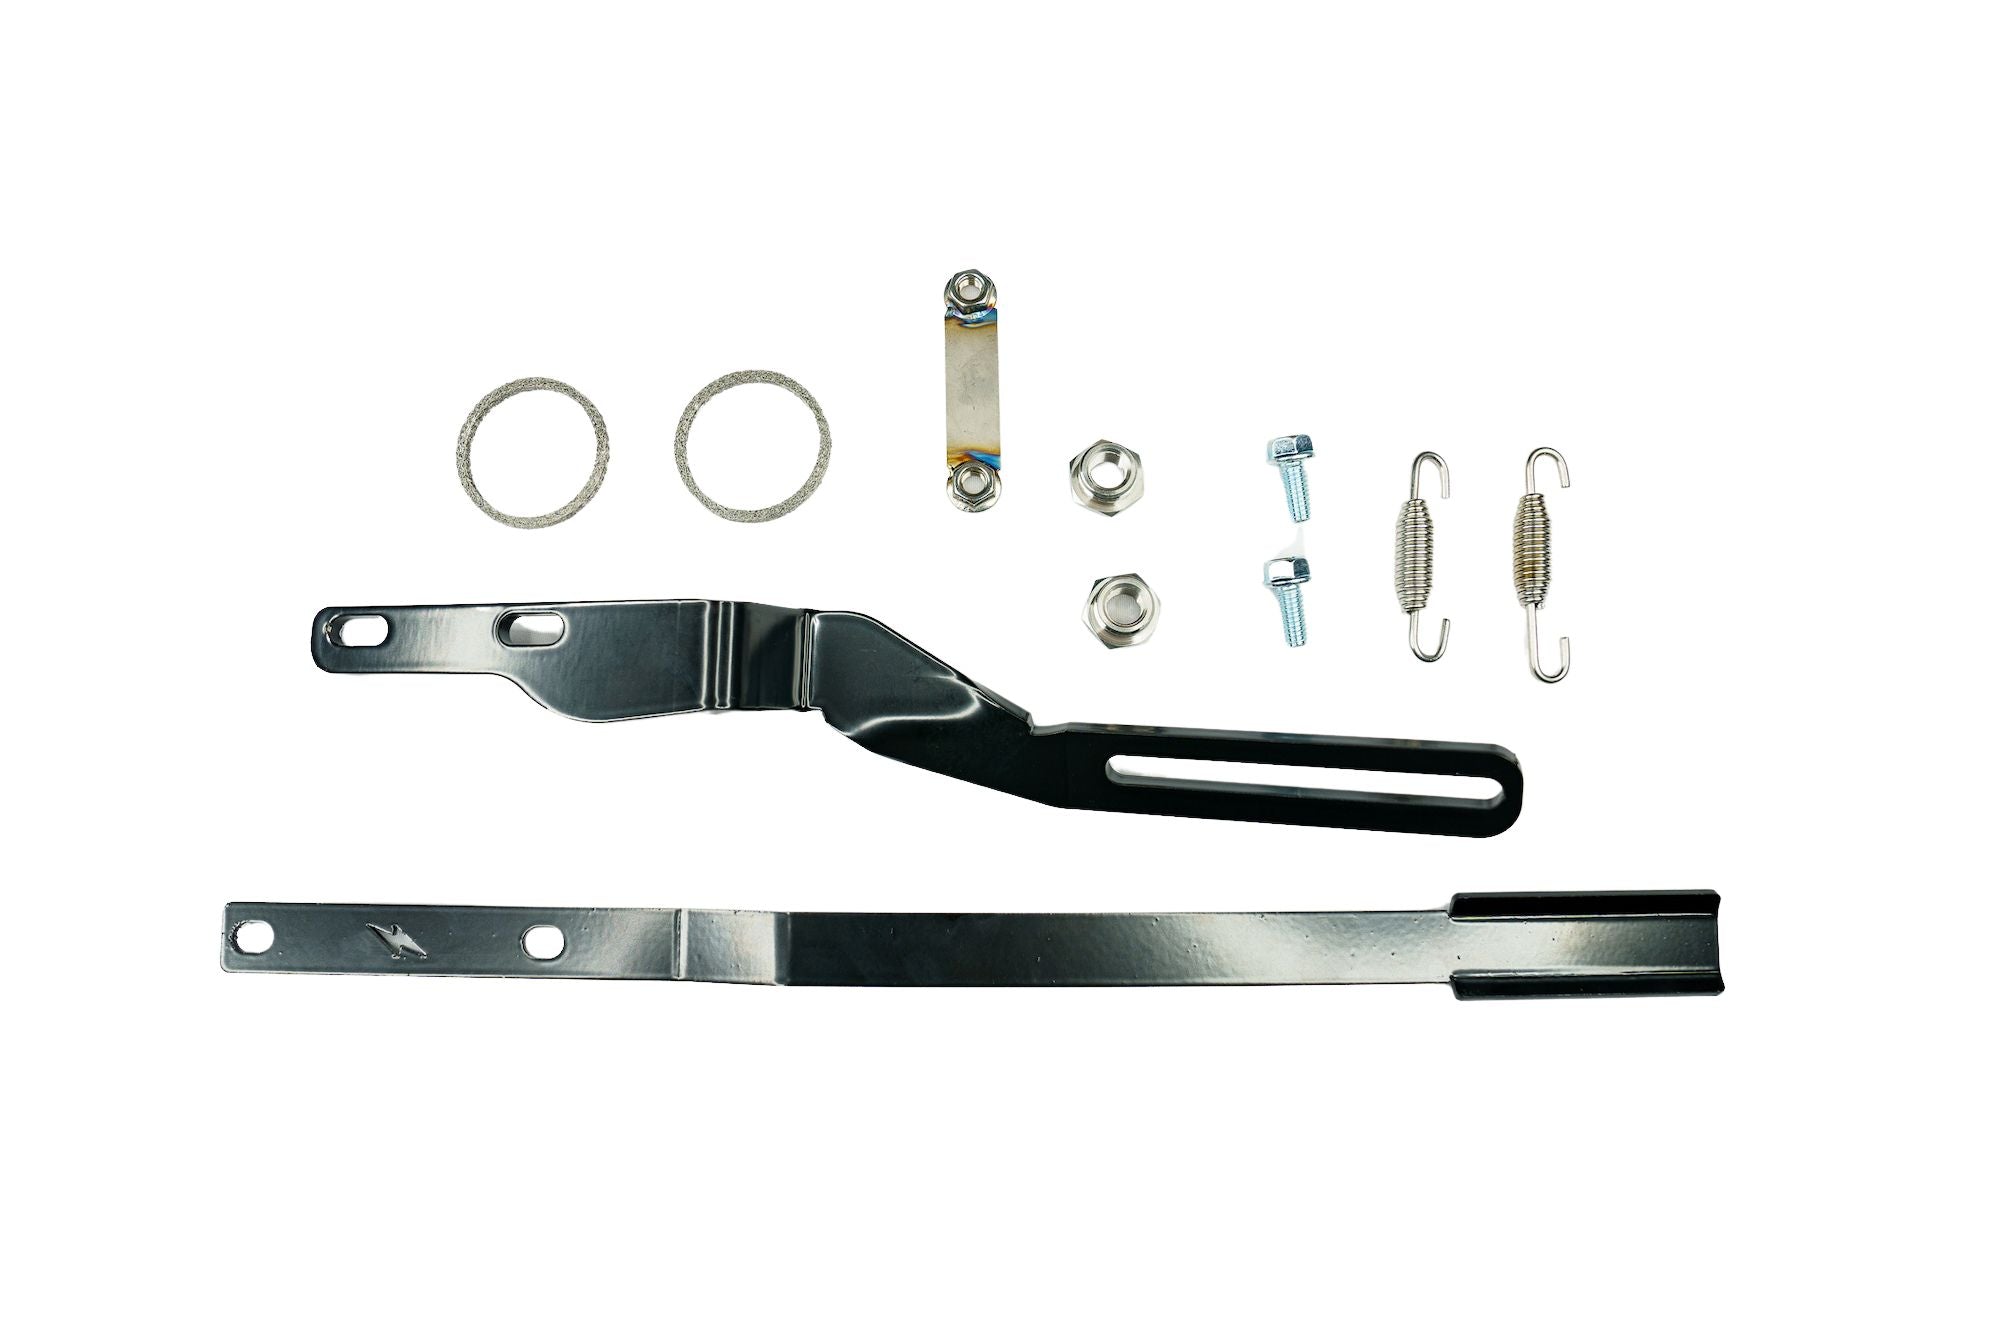
[{"id":419723608288,"handle":"accessories","updated_at":"2026-07-15T07:09:20-04:00","published_at":"2023-10-16T16:54:04-04:00","sort_order":"manual","template_suffix":"","published_scope":"global","title":"Accessories","body_html":"","image":{"created_at":"2024-01-03T15:00:46-05:00","alt":null,"width":1200,"height":800,"src":"\/\/sawickispeed.com\/cdn\/shop\/collections\/Universal_heat_shields_curved_carbon_fiber.jpg?v=1704312047"}},{"id":263386005703,"handle":"replacement-parts","updated_at":"2026-07-15T07:09:20-04:00","published_at":"2021-03-23T11:00:05-04:00","sort_order":"price-desc","template_suffix":"","published_scope":"global","title":"Brackets","body_html":"","image":{"created_at":"2023-05-15T14:40:06-04:00","alt":null,"width":900,"height":600,"src":"\/\/sawickispeed.com\/cdn\/shop\/collections\/930-01109_Sawicki_Bagger_Short_and_Mid_Exhaust_Bracket_B.jpg?v=1686667039"}},{"id":426835280096,"handle":"end-caps","updated_at":"2026-07-14T07:08:47-04:00","published_at":"2024-01-17T18:01:55-05:00","sort_order":"best-selling","template_suffix":"","published_scope":"global","title":"End Caps","body_html":"","image":{"created_at":"2024-01-17T18:01:55-05:00","alt":null,"width":1000,"height":800,"src":"\/\/sawickispeed.com\/cdn\/shop\/collections\/home_collection_caps.jpg?v=1705532515"}},{"id":418460729568,"handle":"hardware-kits","updated_at":"2026-07-13T13:23:12-04:00","published_at":"2023-07-31T15:42:56-04:00","sort_order":"best-selling","template_suffix":"","published_scope":"global","title":"Hardware Kits","body_html":"","image":{"created_at":"2024-01-17T16:51:44-05:00","alt":null,"width":2300,"height":1533,"src":"\/\/sawickispeed.com\/cdn\/shop\/collections\/The1-2-600.jpg?v=1705528304"}},{"id":419752050912,"handle":"harley-davidson-cvos","updated_at":"2026-07-15T07:09:20-04:00","published_at":"2023-10-17T15:42:37-04:00","sort_order":"manual","template_suffix":"","published_scope":"global","title":"Harley-Davidson CVO","body_html":"Premium performance exhaust for the most discerning Harley riders. Specially designed for 2017-2022 CVO models and 2023-24 CVO VVT models.","image":{"created_at":"2023-10-17T15:42:36-04:00","alt":"Sawicki Speed exhaust for Harley CVO Baggers","width":2000,"height":1333,"src":"\/\/sawickispeed.com\/cdn\/shop\/collections\/M8_Bagger_Full_Length_Brushed_Black_Billet_on_CVO.jpg?v=1704314658"}},{"id":239354052807,"handle":"harley-dyna-exhausts","updated_at":"2026-07-15T07:09:20-04:00","published_at":"2020-12-17T17:10:44-05:00","sort_order":"manual","template_suffix":"","published_scope":"global","title":"Harley-Davidson Dyna","body_html":"\u003cp data-mce-fragment=\"1\"\u003e\u003cspan data-mce-fragment=\"1\"\u003eTHIS is the exhaust that started a movement. \u003c\/span\u003e\u003c\/p\u003e\n\u003cp data-mce-fragment=\"1\"\u003e\u003cspan data-mce-fragment=\"1\"\u003eNewly redesigned with better performance and additional ground clearance in mind while offering that signature custom \u003c\/span\u003e\u003cspan data-mce-fragment=\"1\"\u003elook and a powerful Sawicki sound. \u003cspan style=\"font-size: 0.875rem;\" data-mce-fragment=\"1\" data-mce-style=\"font-size: 0.875rem;\"\u003eAll pipes are made with mandrel bent, aircraft quality 304 stainless steel featuring a h\u003c\/span\u003e\u003cspan style=\"font-size: 0.875rem;\" data-mce-fragment=\"1\" data-mce-style=\"font-size: 0.875rem;\"\u003eand-formed merge collector that allows for precise flow performance.\u003c\/span\u003e\u003c\/span\u003e\u003cbr\u003e\u003c\/p\u003e\n\u003cp data-mce-fragment=\"1\"\u003eAvailable in Brushed, \u003cspan data-mce-fragment=\"1\"\u003eCeramic Coated Black, and Mirror Polished\u003c\/span\u003e\u003c\/p\u003e","image":{"created_at":"2023-06-21T15:46:34-04:00","alt":"A Harley Dyna motorcycle equipped with Sawicki Speed Big Inch Shorty 2-into-1 exhaust parked in front of a wooded backdrop.","width":2000,"height":1127,"src":"\/\/sawickispeed.com\/cdn\/shop\/collections\/DSC03611.jpg?v=1782339762"}},{"id":407558389984,"handle":"harley-davidson-fxr-exhausts","updated_at":"2026-07-15T07:09:20-04:00","published_at":"2022-06-15T10:28:30-04:00","sort_order":"manual","template_suffix":"model-family-with-text","published_scope":"global","title":"Harley-Davidson FXR","body_html":"\u003cp\u003ePLEASE NOTE: We currently do not offer exhaust systems for Harley FXR models. If you own one of our Big Inch Shorty exhausts for FXRs, we do still offer heat shields, end caps, replacement brackets and hardware kits. We also have a few billet aluminum accessories that are compatible with these models.\u003c\/p\u003e","image":{"created_at":"2023-06-09T12:07:00-04:00","alt":null,"width":2855,"height":1971,"src":"\/\/sawickispeed.com\/cdn\/shop\/collections\/fxrsawickispeedbrushlesscannon.jpg?v=1686326859"}},{"id":239353921735,"handle":"harley-m8-bagger-exhausts","updated_at":"2026-07-15T07:09:20-04:00","published_at":"2022-03-24T14:51:44-04:00","sort_order":"manual","template_suffix":"Default collection","published_scope":"global","title":"Harley-Davidson M8 Bagger","body_html":"\u003cdiv style=\"text-align: center;\"\u003e\u003cbr\u003e\u003c\/div\u003e","image":{"created_at":"2023-04-25T16:15:34-04:00","alt":"A red Harley M8 Bagger motorcycle equipped with Sawicki Speed Intimidator exhaust parked in front of a wooded backdrop.","width":2000,"height":1127,"src":"\/\/sawickispeed.com\/cdn\/shop\/collections\/HardDrive-007.jpg?v=1782339875"}},{"id":239465627847,"handle":"harley-m8-softail-exhausts","updated_at":"2026-07-15T07:09:20-04:00","published_at":"2020-12-18T15:03:23-05:00","sort_order":"manual","template_suffix":"","published_scope":"global","title":"Harley-Davidson M8 Softail","body_html":"","image":{"created_at":"2023-05-15T14:28:02-04:00","alt":"A red Harley M8 Softail Low Rider ST motorcycle equipped with Sawicki Speed Intimidator exhaust on a black backdrop.","width":2000,"height":1127,"src":"\/\/sawickispeed.com\/cdn\/shop\/collections\/DSC02303_1.jpg?v=1782339926"}},{"id":418049753312,"handle":"harley-davidson","title":"Harley-Davidson Motorcycles","updated_at":"2026-07-15T07:09:20-04:00","body_html":"","published_at":"2023-06-05T01:21:42-04:00","sort_order":"manual","template_suffix":"harley-davidson","disjunctive":false,"rules":[{"column":"tag","relation":"equals","condition":"harley"},{"column":"tag","relation":"equals","condition":"harley davidson"}],"published_scope":"global","image":{"created_at":"2023-06-05T01:23:22-04:00","alt":null,"width":2000,"height":1127,"src":"\/\/sawickispeed.com\/cdn\/shop\/collections\/930-01225_TC_Bagger_Shorty_Cannon_brushed_2.jpg?v=1782340426"}},{"id":412140241120,"handle":"harley-davidson-pan-america","updated_at":"2026-07-14T07:08:47-04:00","published_at":"2022-09-12T17:03:22-04:00","sort_order":"manual","template_suffix":"","published_scope":"global","title":"Harley-Davidson Pan America","body_html":"","image":{"created_at":"2023-06-09T12:02:50-04:00","alt":null,"width":1280,"height":854,"src":"\/\/sawickispeed.com\/cdn\/shop\/collections\/930-4000panamericanasawickispee.jpg?v=1686326570"}},{"id":239354282183,"handle":"harley-sportster-exhausts","updated_at":"2026-07-15T07:09:20-04:00","published_at":"2020-12-17T17:16:32-05:00","sort_order":"manual","template_suffix":"","published_scope":"global","title":"Harley-Davidson Sportster","body_html":"\u003ch1\u003e\u003c\/h1\u003e","image":{"created_at":"2023-05-04T16:52:46-04:00","alt":"A Harley Sportster motorcycle equipped with Sawicki Speed Shorty 2-into-1 exhaust parked in front of a wooded backdrop.","width":2000,"height":1127,"src":"\/\/sawickispeed.com\/cdn\/shop\/collections\/sawicki_sporty_shorty18.jpg?v=1782339727"}},{"id":418915320032,"handle":"harley-twin-cam-softail-exhausts","updated_at":"2026-07-15T07:09:20-04:00","published_at":"2023-09-21T16:27:46-04:00","sort_order":"manual","template_suffix":"","published_scope":"global","title":"Harley-Davidson Twin Cam Softails","body_html":"","image":{"created_at":"2023-09-22T13:45:18-04:00","alt":"Harley-Davidson twin cam Softail with Sawicki Speed 2-into-1 shorty exhaust","width":4032,"height":3024,"src":"\/\/sawickispeed.com\/cdn\/shop\/collections\/TC_Softail_Shorty.jpg?v=1779299721"}},{"id":419751788768,"handle":"hats","updated_at":"2026-07-15T12:04:35-04:00","published_at":"2023-10-17T15:29:25-04:00","sort_order":"manual","template_suffix":"merch","published_scope":"global","title":"Hats","body_html":"","image":{"created_at":"2025-07-29T13:47:06-04:00","alt":null,"width":2000,"height":1050,"src":"\/\/sawickispeed.com\/cdn\/shop\/collections\/snapbackHats-1800x1200.jpg?v=1757098786"}},{"id":417450852576,"handle":"heat-shields","updated_at":"2026-07-15T07:09:20-04:00","published_at":"2023-04-17T13:22:58-04:00","sort_order":"price-desc","template_suffix":"","published_scope":"global","title":"Heat Shields","body_html":"\u003cp\u003eWhile they're are not required for Sawicki exhausts, heat shields provide added comfort and protection by helping reduce radiant exhaust heat around your legs and riding gear. They also help protect against accidental contact with hot exhaust components during everyday riding. Many riders also like the clean, finished appearance that comes with a pair of heat shields.\u003c\/p\u003e\n\u003cp\u003eMost of our exhaust systems – including all exhausts for Harley M8 and Twin Cam Touring and Softail models – will work best with a 3\" CLR curved and a straight heat shield. See each heat shield description for complete bike model lists or to download a printout to ensure you make the right choice.\u003c\/p\u003e","image":{"created_at":"2023-04-29T18:59:21-04:00","alt":null,"width":638,"height":485,"src":"\/\/sawickispeed.com\/cdn\/shop\/collections\/heashields-1.jpg?v=1682882262"}},{"id":419513630944,"handle":"hoodies","updated_at":"2026-07-14T07:08:47-04:00","published_at":"2023-10-09T14:49:27-04:00","sort_order":"manual","template_suffix":"merch","published_scope":"global","title":"Hoodies","body_html":"","image":{"created_at":"2025-07-29T13:46:22-04:00","alt":null,"width":2000,"height":750,"src":"\/\/sawickispeed.com\/cdn\/shop\/collections\/hoodies-1800x1200.jpg?v=1757441166"}},{"id":412139454688,"handle":"indian-challenger-exhausts","updated_at":"2026-07-15T07:09:20-04:00","published_at":"2022-09-12T16:45:24-04:00","sort_order":"manual","template_suffix":"","published_scope":"global","title":"Indian Challenger","body_html":"","image":{"created_at":"2023-05-15T14:02:17-04:00","alt":"Indian Challenger motorcycle equipped with Sawicki Speed full length 2-into-1 exhaust parked in front of a wooded background.","width":2000,"height":1127,"src":"\/\/sawickispeed.com\/cdn\/shop\/collections\/1swicki_challenger.jpg?v=1782339696"}},{"id":412139389152,"handle":"indian-ftr-exhausts","updated_at":"2026-07-14T07:08:47-04:00","published_at":"2022-09-12T16:45:00-04:00","sort_order":"manual","template_suffix":"","published_scope":"global","title":"Indian FTR","body_html":"","image":{"created_at":"2022-09-12T16:49:26-04:00","alt":null,"width":3924,"height":2615,"src":"\/\/sawickispeed.com\/cdn\/shop\/collections\/RWM00065.jpg?v=1663015767"}},{"id":277551251655,"handle":"indian-motorcycles","updated_at":"2026-07-15T07:09:20-04:00","published_at":"2021-08-16T18:32:26-04:00","sort_order":"manual","template_suffix":"","published_scope":"global","title":"Indian Motorcycles","body_html":"\u003cdiv style=\"text-align: center;\"\u003e\n\u003cmeta charset=\"utf-8\"\u003e \u003cspan data-mce-fragment=\"1\"\u003e\u003c\/span\u003e\n\u003c\/div\u003e\n\u003ch2 style=\"text-align: center;\"\u003e \u003c\/h2\u003e\n\u003cp\u003e \u003c\/p\u003e","image":{"created_at":"2023-05-15T14:24:01-04:00","alt":null,"width":2000,"height":1127,"src":"\/\/sawickispeed.com\/cdn\/shop\/collections\/indian_motorcycles_scout_sawicki.jpg?v=1782340435"}},{"id":419723673824,"handle":"replacements","updated_at":"2026-07-15T07:09:20-04:00","published_at":"2023-10-16T17:00:18-04:00","sort_order":"best-selling","template_suffix":"","published_scope":"global","title":"Replacement Parts","body_html":"","image":{"created_at":"2024-01-03T15:00:18-05:00","alt":null,"width":2000,"height":1333,"src":"\/\/sawickispeed.com\/cdn\/shop\/collections\/The1-2-612.jpg?v=1704312145"}},{"id":401037983968,"handle":"garage-sale-items","updated_at":"2026-07-13T13:23:11-04:00","published_at":"2022-02-01T15:03:44-05:00","sort_order":"best-selling","template_suffix":"","published_scope":"global","title":"Scratch and Dent","body_html":"\u003cp\u003eCheck here for your scratch and dent, used items or discounted items!\u003cbr\u003eItems sold here are done \"As Is\" and do not imply any certain warranties.\u003c\/p\u003e"},{"id":419513598176,"handle":"t-shirts","updated_at":"2026-07-15T07:09:20-04:00","published_at":"2023-10-09T14:49:07-04:00","sort_order":"manual","template_suffix":"merch","published_scope":"global","title":"T-Shirts","body_html":"","image":{"created_at":"2025-07-29T13:46:34-04:00","alt":null,"width":4132,"height":2241,"src":"\/\/sawickispeed.com\/cdn\/shop\/collections\/shirts-1800x1200.jpg?v=1764094238"}}]
The Sawicki Speed Gift Card is the perfect gift for any occasion. It offers a convenient, pre-paid way to purchase items from the Sawicki Speed website. The perfect way to show family and friends you care.